This handbook helps you get started. We show you everything step by step. You do not need to know anything in advance.
What is this handbook for?
You get to know the most important tools.
You find clear instructions for every step.
You can look things up at any time.
You save time in your daily work.
💡 Tip
The screenshots in this handbook show the German interface. That is why we give the English name of a button or menu item first and add the German original in brackets the first time it appears – for example Orders (in German: "Bestellungen"). Most platforms let you switch the interface language in the settings.
Legend
You will find three symbols in the handbook. Here is what they mean:
⚠️ Important
Attention! You should definitely read this. Otherwise something can go wrong.
💡 Tip
A useful hint. It makes your work easier or faster.
✅ Done
Great, you have completed a step. Let's move on.
Chapter 1 – WordPress Basics
What is WordPress?
WordPress is a tool that lets you create and maintain a website very easily.
Where do I log in?
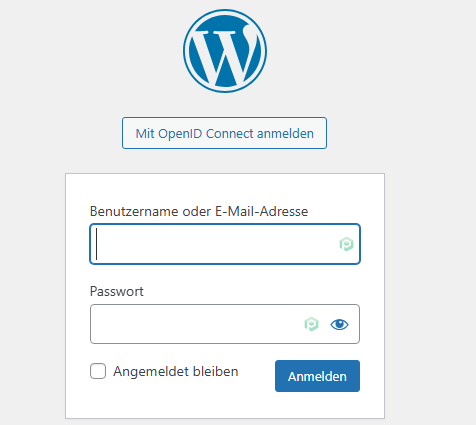
This is how you get to the administration area (also called the "backend"):
Open your browser (e.g. Chrome, Firefox or Safari).
Enter the address of your website. Add "/wp-admin" at the end.
Example: www.your-site.com/wp-admin
Enter your username.
Enter your password.
Click the Log In (in German: "Anmelden") button.
WordPress login page
⚠️ Important
Never share your password with strangers. Keep it in a safe place.
What do I see after logging in?
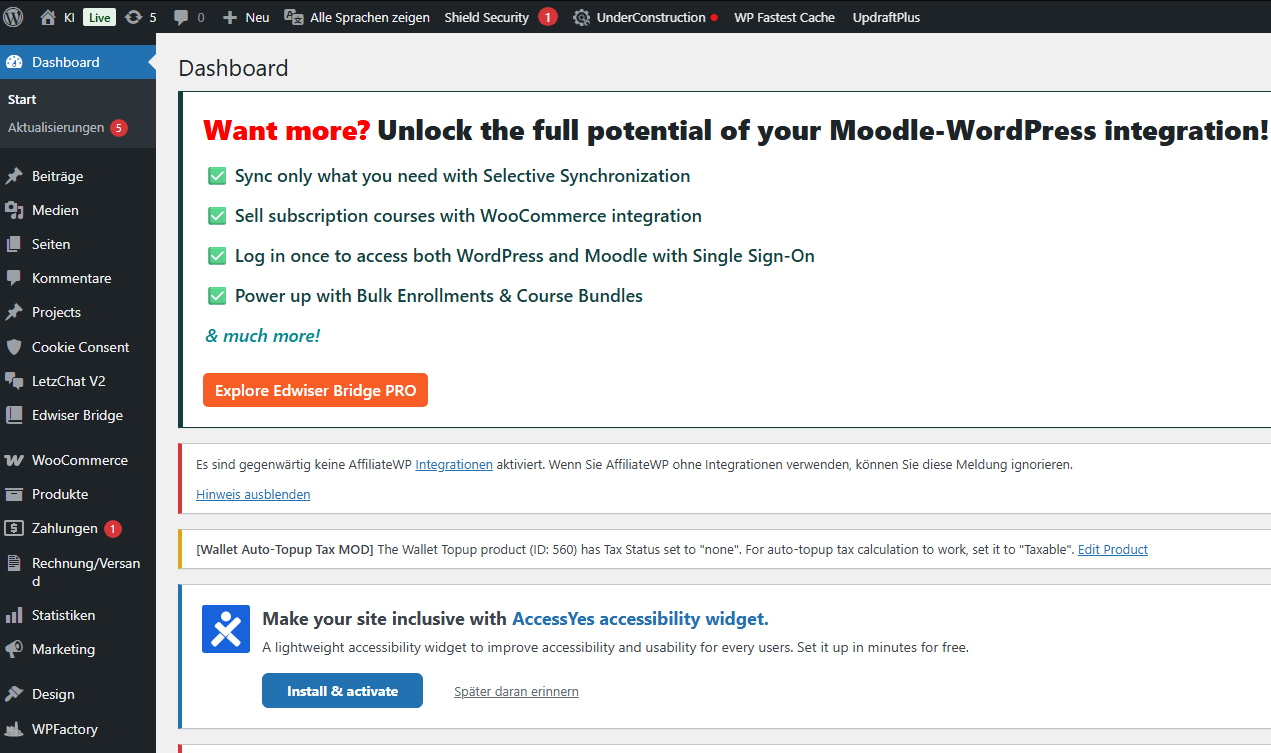
After logging in you see the so-called "dashboard". This is your start page in WordPress.
The dashboard has three main areas:
Top
Quick access bar
Black bar along the top edge with the most important direct links.
Left
Main menu
The menu with all functions – it takes you to every area of WordPress.
Center
Work area
This is where everything happens – content is displayed and edited here.
WordPress dashboard – menu bar on the left, work area in the center
The most important functions
These menu items are the ones you need most often. You find them in the left-hand menu bar.
Function
What for?
Cookie Consent
Here you can upload your chatbot script. This embeds the chatbot into your website, where it appears in the bottom right corner.
LetzChat V2
Access to the AI platform. Here you manage your chatbot and swap out your logo, for example.
WooCommerce / Payments (in German: "Zahlungen")
Your online shop. Here you see orders, create coupons for your customers and set up Stripe via Payments, so that you receive the money from your shop sales directly.
Products (in German: "Produkte")
View and search all products in your shop, create new products and import or export products.
Invoice / Shipping (in German: "Rechnung / Versand")
Store company details and a logo for invoices and adjust the look of your invoices.
Users (in German: "Benutzer")
View registered users, create new users, assign roles (customer or administrator) and set up two-factor authentication.
Wallet
Top up virtual credit for individual users – e.g. to credit funds to yourself.
Affiliates
Partner program for your shop: people promote your products via a personal link and receive a commission for every sale.
Post SMTP
Makes sure that emails from your website (e.g. confirmations, password resets) reliably reach the customer instead of ending up in spam.
💡 Tip
Feel free to click through the menu once. You cannot break anything as long as you do not save or delete anything.
Embedding the chatbot via Cookie Consent
In the Cookie Consent area you upload your chatbot script. As soon as the script is saved, the chatbot automatically appears in the bottom right corner on every page of your website.
This is how you get to the input field:
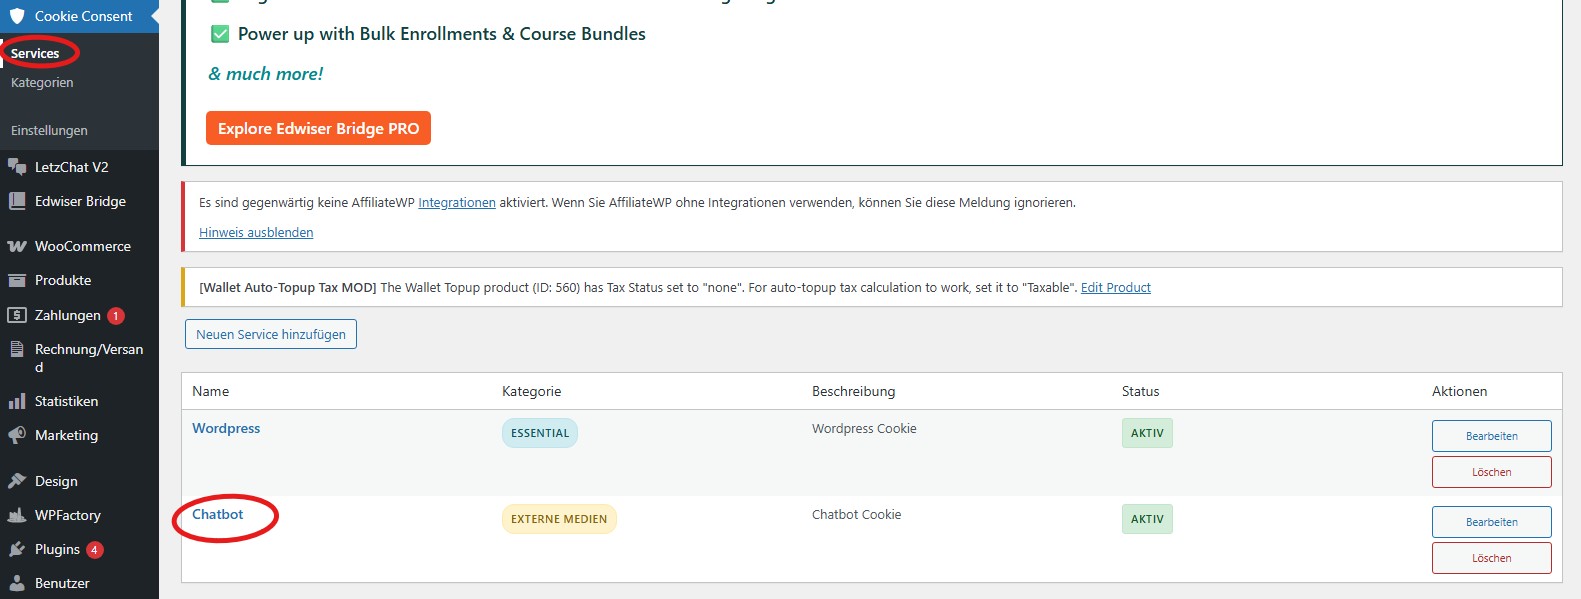
In the menu on the left, hover over Cookie Consent.
In the submenu that opens, the Service area appears – click on it.
In the list, click once on the Chatbot.
Scroll down.
Paste your chatbot script into the field provided and save.
Cookie Consent – this is where the chatbot script is stored
LetzChat V2 – opening the AI platform
Via LetzChat V2 you get to the AI platform where you manage your chatbot.
This is how you open the platform:
In the menu on the left, hover over LetzChat V2.
In the submenu that opens, click on Dashboard.
You land directly on the AI platform.
Swapping out the logo:
Hover over LetzChat V2 again.
In the submenu, click on Settings.
There you can upload or replace your logo.
LetzChat V2 – submenu with Dashboard and Settings
Payments & WooCommerce
Via Payments (in German: "Zahlungen") you connect your shop to Stripe. Via WooCommerce you manage orders and create coupons.
Payments – setting up Stripe
So that you receive the money directly from the customer, you have to set up Stripe once in the Payments (in German: "Zahlungen") area.
In the menu on the left, click on Payments.
Next to Stripe, click on Set up (in German: "Einrichten").
Follow the steps to connect your account to Stripe.
Payments – setting up Stripe
WooCommerce – managing orders
In the Orders (in German: "Bestellungen") area you can track all orders and see who ordered what in your shop. You can also add an order manually there.
In the menu on the left, hover over WooCommerce.
In the submenu, click on Orders.
You see a list of all orders with customer, product and status.
Using the button at the top you can create an order manually if needed.
WooCommerce – orders overview
WooCommerce – creating coupons
With coupons you can grant your customers discounts.
In the menu on the left, hover over WooCommerce.
In the submenu, click on Coupons (in German: "Gutscheine").
At the top left, click on Add coupon (in German: "Gutschein erstellen").
Define the code, discount and conditions and save.
WooCommerce – coupons overview with the "Add coupon" buttonAdd coupon – define the code and the discount
Managing products
In the Products (in German: "Produkte") area you manage everything that is offered in your shop.
In the menu on the left, hover over Products.
In the submenu, click on All Products (in German: "Alle Produkte") – you see the list of all products you offer in your shop.
Using the search field you can search for a specific product.
At the top, click the Add product (in German: "Produkt hinzufügen") button to create a new product.
Using the buttons at the top you can also import (in German: "importieren") or export (in German: "exportieren") products.
Products – overview with search, add, import and export
Invoice & Shipping
Via Invoice / Shipping (in German: "Rechnung / Versand") you store your company details and adjust the look of your invoices.
Storing company details for invoices
So that your company details appear correctly on every invoice, you enter them once in the general settings.
In the menu on the left, hover over Invoice / Shipping (in German: "Rechnung / Versand").
In the submenu, click on General Settings (in German: "Allgemeine Einstellungen").
At the top of the header, click on the General (in German: "Allgemeines") tab.
Enter company details, logo, address etc. and save.
Invoice / Shipping – general settings for company details
Adjusting the look of the invoice
You can see what your invoice looks like and adjust the colors and the layout.
In the menu on the left, hover over Invoice / Shipping (in German: "Rechnung / Versand").
In the submenu, click on Invoice (in German: "Rechnung").
At the top of the header, click on Customize (in German: "Anpassen").
Check the preview and change the colors and other settings as you wish.
Invoice – preview and customization of colors and layout
Managing users
In the Users (in German: "Benutzer") area you see which users are already registered, and you can create new users.
Users – overview of all registered users
Adding a new user
In the menu on the left, go to Users (in German: "Benutzer") and click on Add New (in German: "Hinzufügen").
Enter Username (in German: "Benutzername"), Email (in German: "E-Mail"), First Name (in German: "Vorname") and Last Name (in German: "Nachname").
Use the automatically generated password or enter one of your own.
Important: under Role (in German: "Rolle") define whether it is Customer (in German: "Kunde") or Administrator.
Click on Save (in German: "Speichern").
⚠️ Understanding roles
Administrator: has access to everything – including other accounts. Customer: only sees the platform and their own data, has no access to WordPress.
The screenshot below shows an English WordPress interface, where the role is called Customer (in German: "Kunde"). The important part: do not pick Subscriber (in German: "Abonnent").
Defining the role – select "Customer" (in German: "Kunde"), not "Subscriber"
Setting up two-factor authentication (2FA)
As soon as an administrator account has been saved, two-factor authentication must be set up – this is mandatory.
Download an authenticator app (e.g. Google Authenticator or Authy) onto your smartphone.
Scan the displayed QR code with the app.
Enter the number shown in the app into the field provided.
Click on Save (in German: "Speichern") at the very bottom – 2FA is now active.
2FA – scan the QR code and enter the code
Wallet – top up credit
In the Wallet area you can top up virtual credit for individual users – e.g. to credit money to yourself.
In the menu on the left, hover over Wallet.
In the submenu, click on Credit/Debit Funds.
First select a user. Important: the field must show Include User – there you can also add a user in order to top up credit for yourself.
Under Credit/Debit, select the Credit option.
Finally, enter the desired amount (e.g. 300) and save.
Wallet – top up credit via Credit/Debit Funds
Affiliates – partner program
With Affiliates you build a referral program for your shop. Partners promote your products via a personal link and automatically receive a commission for every purchase they refer.
When you hover over Affiliates in the menu on the left, you find the following areas:
Submenu
What for?
Overview (in German: "Überblick")
Dashboard with the most important figures at a glance: referrals, revenue, outstanding commissions.
Affiliates
List of all partners – here you can add, approve or block partners and view their personal link.
Referrals (in German: "Empfehlungen")
Every order that was triggered via an affiliate link, with the commission amount and status.
Payouts (in German: "Auszahlungen")
Overview of commissions that are being paid out to affiliates or have already been paid out.
Visits (in German: "Besuche")
Clicks on affiliate links – even when no purchase has (yet) been made.
Creatives (in German: "Werbeanzeigen")
Banners and creatives that you provide to your affiliates for promotion.
Reports (in German: "Berichte")
Evaluations by time period, top affiliates and revenue.
Tools (in German: "Werkzeuge")
Helper functions such as import/export or repairing data.
Settings (in German: "Einstellungen")
Define the commission rate (e.g. 10 %), cookie duration, payment method and email templates.
Add-ons
Optional extensions, e.g. PayPal payout or lifetime commissions.
💡 Tip
Before you promote the affiliate program, define the commission rate and the cookie duration once in the Settings. That way every partner knows how much they get per sale.
Post SMTP – setting up email delivery
By default, WordPress sends emails via the simple PHP mail() function. That does work — but many hosting providers block it, and recipients often filter such mails as spam. With the Post SMTP plugin you send emails via a real mail server instead. That way order confirmations, password resets and inquiry emails reliably reach the customer.
The most important functions of Post SMTP:
Secure SMTP delivery – emails go through an authenticated mail server instead of the PHP mail() function.
Adjust sender details – the name and "from" address that the recipient sees in their inbox.
Log – every sent email is logged, so you see what went out and whether it was successful.
Test email – one click to send a sample mail in order to check the settings.
Entering the sender name and sender email
So that confirmations and notifications arrive in the name of your company (and not, for example, as wordpress@your-domain.com), you store your sender details once:
Hover over Post SMTP in the left-hand WordPress menu.
In the submenu that opens, click on Settings.
At the top of the tab bar (header), click on Message.
In the From Name field, enter your display name (e.g. your company name).
In the From Email field, enter the sender email — the address that your customers should see in their inbox.
At the very bottom, click on Save Changes.
Post SMTP – Message tab with sender name and sender email
💡 Tip
Use a real address of your own domain as the sender email (e.g. info@your-domain.com), not an external one such as @gmail.com. Otherwise your mails end up in spam more often, because the domain record does not match the sender address.
Setting up SMTP credentials (Connections tab)
The SMTP credentials of YOUNEA are already stored and connected on your website. If you would like to use your own email address, you can adjust the details here. You get the required credentials from your email provider or hosting provider.
At the top of the tab bar, click on Connections.
Under Mailer, select the SMTP option.
In the SMTP Host field, enter the address of the mail server.
Set the Port to 587.
Under Encryption, select the TLS option.
Set Authentication to Yes.
In the Username field, enter your email address.
In the Password field, enter your email password.
At the very bottom, click on Save Changes.
Post SMTP – setting up SMTP credentials in the Connections tab
Chapter 2 – LuxAIaaS
What is LuxAIaaS?
LuxAIaaS stands for "Luxembourg Artificial Intelligence as aService" – in plain words: "AI as a service, made in Luxembourg".
It is our own AI platform. It helps you give your customers fast answers. And it does so automatically – without you having to sit in front of a screen.
Think of LuxAIaaS as a hard-working employee. He is awake 24 hours a day. He never gets sick. And he always answers politely.
The Dashboard
After logging in you land directly in the Dashboard. Here you find an overview of all your bots and your credit.
LuxAIaaS Dashboard – overview of bots and credit
Top right
Profile (in German: "Profil") – your user name with a drop-down menu leading to your account settings.
Light/Dark mode (in German: "Hell-/Dunkel-Modus") – use the icon to switch the system between a light and a dark appearance.
Help (?) (in German: "Hilfe") – a click on the question mark starts our Tour. The tour explains step by step how everything works. If you get stuck somewhere: just click the ? once and you will get more information about it.
Language (in German: "Sprache") – the platform language can be switched to German, English, Spanish, Arabic or French.
Managing bots
Buy new chatbot (in German: "Neuen Chatbot kaufen") – use the big button to buy a new bot directly in the Dashboard.
Bot overview (in German: "Bot-Übersicht") – for every bot the table shows you when it was bought (registration), whether it is Active or Inactive, and what costs it generates (last month / last 3 months).
Search (in German: "Suche") – use the search field to filter your bots by bot ID, name, user name, e-mail or number.
Show deleted (in German: "Gelöschte anzeigen") – switch on Show deleted to also display bots that have already been deleted in the overview.
Credit
Available credit (in German: "Verfügbares Guthaben") – is shown at the top right in euros.
Top up credit manually (in German: "Manuelles Guthaben aufladen") – enter an amount and click Top up credit to add money right away.
To the credit page (in German: "Zur Kreditseite") – this button takes you to the Credit area. There you can set up top-up options (e.g. automatic top-up) and view your history.
Credit area
In the Credit area (in German: "Guthaben") – reachable via the left sidebar or the To the credit page button – you can top up your credit manually or automatically.
Credit management – manual and automatic top-up
Automatic credit top-up
You can define a threshold: as soon as your credit falls below this value, a top-up amount you have defined is added automatically.
Example: threshold €60 – as soon as only €55 is left, the system automatically tops up the amount you specified.
Manual credit top-up
Enter any amount in the Top-up amount field and click Top up credit.
💡 Tip
Whether you top up manually or confirm the automatic top-up via Authorise (in German: "Autorisieren") – you are taken straight to the checkout page to complete the payment.
⚠️ Important
Topping up via the LuxAIaaS credit management is intended for customers only. If you want to top up credit as an administrator, do it in WordPress via Wallet:
If you scroll further down in the Credit area, you see your recent transactions – including a chart that shows top-ups, usage fees, voice subscriptions, chat subscriptions and your balance in colour.
You can filter the list by:
From / To (in German: "Von / Bis") – narrow down the period.
Category (in German: "Kategorie") – the drop-down offers All categories, Top-ups, Usage fee, Chat subscription, Voice subscription and Other.
Bot – show only transactions of a specific bot.
Use the Export CSV (in German: "CSV exportieren") button at the top right to download the filtered transactions as a CSV file.
Recent transactions – chart, filters and CSV export
Bot Usage
Scroll down a bit further and you reach the Bot Usage (in German: "Bot-Nutzung") area. Here you see at a glance which bot has caused how many costs.
Three pie charts compare the distribution:
Last month – spending per bot over the past 30 days.
Last 3 months – medium-term development.
Last 6 months – long-term comparison.
When you hover the mouse over a chart segment, the bot name, ID, phone number and the exact amount are shown.
Below the charts you find a table with all bots and their spending for 1 month, 3 months and 6 months side by side – ideal for quickly spotting whether a bot has become more or less expensive.
Bot Usage – pie charts and table with spending per bot
Instruction Generator
With the Instruction Generator (in German: "Anweisungsgenerator") you create a suitable prompt in just a few minutes – for example for sending e-mails, or a prompt that fits your company exactly.
The generator asks you a few questions – you answer them, and in the end you get a ready-made prompt that you can use directly for your bot.
Here is how to do it:
Click Instruction Generator in the left sidebar.
Click New chat (in German: "Neuer Chat") to create a new instruction (or open an earlier chat from the list on the left).
Answer the generator's questions, e.g.:
Type of bot – chatbot or e-mail writing assistant?
For which environment? – industry, business, target group (customers, colleagues, B2B, B2C …).
Main purpose – e.g. customer service answers, application e-mails, newsletters.
Write your answers in the Talk to the Instruction Generator (in German: "Sprechen Sie mit dem Instruction Generator") field and send them.
At the end you receive a ready-made prompt – copy it and paste it into your chatbot or phone bot.
Instruction Generator – step by step to the right prompt
💡 Tip
Earlier chats stay saved in the list on the left (e.g. Creating Email Prompt). You can reopen and adjust them at any time without starting from scratch.
Knowledge Base
In the Knowledge Base (in German: "Wissensdatenbank") area you manage all documents your bot works with. You see at a glance which content has been uploaded and which processing status it is currently in.
This is how you add a new document:
Click Add document (in German: "Dokument hinzufügen") at the top right.
Select the file you want to upload.
Confirm – the file is taken over and processed automatically.
In the list of your uploaded documents you can, for every entry:
check the current status,
open a preview,
or delete the document if there are problems.
The Health Dashboard above the list shows you the synchronisation status of all documents at a glance.
Knowledge Base – document list with status, preview and Health Dashboard
Chunking settings (admin)
As an admin you can control how documents are prepared for the bot. These so-called chunking settings determine how big the individual text blocks are that the bot works with later on. If the default values fit, you don't need to touch them.
The advanced settings are hidden in the "Add new document" (in German: "Neues Dokument hinzufügen") dialog. Click Next (in German: "Weiter") there – then the "Advanced: Splitting" (in German: "Erweitert: Aufteilung") area opens with three fields for fine-tuning the chunking strategy. By default the fields are empty; in that case the preset values for your account apply.
Separator (in German: "Trennzeichen") – determines where a document is split into chunks. Normally the split happens at paragraph boundaries – that suits most structured documents. For pure running text, a full stop or a line break can make more sense.
Maximum tokens per chunk (in German: "Maximale Tokens pro Chunk") – controls the size of each chunk. Larger values give the bot more context per hit – good for long, connected explanations. Smaller values make hits more precise for specific questions.
Chunk overlap (in German: "Chunk-Überlappung") – how many tokens two consecutive chunks share. A little overlap prevents context from getting lost at chunk boundaries. Too much overlap, on the other hand, doubles the retrieval costs.
💡 Tip
Leaving the fields empty is usually right – the default values are set up to suit your bots. Only if you need different values for a special document should you override them here per file.
Knowledge Base Assistant
Start our Knowledge Base Assistant (in German: "Wissensdatenbank-Assistent") simply by clicking the Start chat (in German: "Chat starten") button. The generator automatically guides you through the process of creating plain text documents out of documents containing text, images or tables.
Fast, simple and effective – optimise your content now for efficient knowledge transfer into the Knowledge Base.
Knowledge Base Assistant – chat-guided creation of text documents
API keys
Via the Public API you can access the Younea LetzChat platform programmatically – e.g. to manage bots, conversations, the Knowledge Base, the wallet or subscriptions from your own applications.
For that to work you need an API key. Click API Keys (in German: "API-Schlüssel") in the left sidebar.
Step 1 – Open key creation
As long as you have not created a key yet, you see the note "No API keys". At the top there are two buttons:
API documentation (in German: "API-Dokumentation") – opens the technical documentation of all endpoints.
Create key (in German: "Schlüssel erstellen") – opens the form for creating a new key.
API key overview – no keys created yet
Step 2 – Configure the key
In the form you define the following points:
Key name (in German: "Schlüsselname") – a unique name by which you will recognise the key later (e.g. the name of the application that uses it).
Permissions (Scopes) (in German: "Berechtigungen") – select which areas the key is allowed to access:
All Scopes – full access to all areas.
Tenant – tenant information and user management.
Bots – manage and configure chatbots.
Knowledge Base – Knowledge Base documents of a bot.
Conversations – conversation history, tasks and comments.
Wallet – credit and transactions.
Pricing – prices, payments and subscriptions.
Addons – addon marketplace and configuration.
Expiry date (in German: "Ablaufdatum") – date in the format dd/mm/yyyy. Leave the field empty for a permanently valid key.
Master key (in German: "Master-Schlüssel") – only activate this in special cases. It lets the key access any tenant via the X-YLC-Target-Tenant header.
A click on Create key generates the API key.
Create API key – name, permissions, expiry date and master option
Using the key
Once the key has been created, you store it in the application that is supposed to talk to LuxAIaaS (e.g. your shop, your CRM or a script of your own). The key consists of two parts:
a fixed prefix ylc_live_ – this is how the system recognises that it is a genuine LuxAIaaS key,
followed by 32 random characters (letters a–f and digits 0–9) – this is your personal, secret part.
So a complete key looks roughly like this: ylc_live_a1b2c3d4e5f6…
So that your application is recognised when it "knocks" on the interface (API), you have to send the key along with every request. This is done via a so-called HTTP header – think of it as an envelope with your ID card on top:
The word Bearer means "carrier" or "holder" – whoever owns the key is allowed to access. That is exactly why you should never pass it on to third parties or store it in plain text.
All requests go to the following base address (the so-called base path):
/wp-json/ki-xx-api/public/v1
You append the respective endpoint to this address – e.g. /bots to retrieve your bots, or /wallet/balance to check your credit balance. You will find an overview of the most important endpoints right below.
The API has rate limits: every response contains the headers X-RateLimit-Limit, X-RateLimit-Remaining and X-RateLimit-Reset. If the limit is exceeded, the server responds with status 429.
Other typical errors:
401 invalid_api_key – the key is missing, wrong or has been revoked.
403 insufficient_scope – the key does not have the necessary permission for this endpoint.
404 not_found / bot_not_found – the resource does not exist or there is no access.
⚠️ Important
Treat an API key like a password. Never store it in plain text in the frontend, in public repositories or in shared documents. Create a separate key for every application, with only the permissions that are really needed – that way you can revoke individual keys at any time without affecting the others.
💡 Tip
Set an expiry date if you only need the key for a one-off project, for example. For permanent integrations you can leave the field empty.
My Account
If you click My Account (in German: "Mein Konto") in the left sidebar, you return to your personal account page. Here you get a compact overview of all the important areas of your account.
My Account – entry in the left sidebar
There you find two large quick links:
to AI Agent Management (in German: "zur AI Agent Verwaltung") – jumps straight back to the LuxAIaaS platform where you manage your bots.
HELPCENTER – opens the Helpcenter with numerous courses on onboarding, agent setup, prompt and Knowledge Base setup, data protection and automation.
Configuration
As soon as you have selected a bot in the Bot Management (in German: "Bot-Verwaltung") area, the entry Configuration (in German: "Konfiguration") appears in the sidebar. A click on it opens the functional settings of your bot – everything that controls its behaviour is on one page here. To the right of it you see a live preview in which you can test your changes immediately.
Configuration – functional settings with live preview
Name & bot ID
At the very top you see the name and the ID of your bot. You need the bot ID for API calls, for example.
Welcome message
This is the first thing a user sees when opening the chat. Keep it inviting and short.
Instructions (rules of behaviour)
This is the brain of your bot: here you describe who he is, what he is allowed to do and how he answers. The more detailed the instructions, the better the answers.
GDPR chat log retention
Here you define for how many days conversations are stored:
-1 – chat logs are not deleted automatically (unlimited).
0 – messages are hidden immediately.
positive number (e.g. 30) – retention in days.
Available Tools
Your bot can use these tools at runtime – e.g. send e-mails or book appointments. By default, tools such as current_time, send_email, my-calendar_CancelAppointment, my-calendar_GetAppDates, my-calendar_book_appointment or my-calendar_RescheduleAppointment are activated. Further tools can be added.
To the right of every function there is an (i) icon. Clicking it opens the info box, which repeats everything about that function: the matching prompt addition to copy, an explanation of what the function does, and the parameters it expects. So there is nothing to memorise – when in doubt, look it up there.
Display settings
If you scroll further down on the configuration page, you reach the Display settings (in German: "Anzeigeeinstellungen"). Here you configure how your bot is presented to visitors in the chat widget.
Display settings – language, bot name and colour theme of the widget
Display language (in German: "Anzeigesprache") – the language of the widget user interface (e.g. German).
Bot name (widget) (in German: "Bot-Name") – this name appears in the chat widget for your visitors.
Bot description (in German: "Bot-Beschreibung") – a short description of the purpose and capabilities of your bot.
Color theme (widget) (in German: "Farbthema") – enter a hex colour code (e.g. #950be5) to match the widget to your brand.
Embedding (website integration)
Scroll down a bit further and you reach the Embedding (in German: "Einbindung") area. Here you find all the code snippets for embedding your bot into your website or other channels.
Embedding – website code, iFrame and QR code for the bot
Website embedding (integration code) (in German: "Website Einbindung") – copy this code snippet using the Copy button. In WordPress you then paste it under Cookie Consent → Service → Chat so that the bot appears on your website.
iFrame – with this <iframe> code you can embed the bot directly into an HTML file.
QR Code – your customers can scan this QR code with their smartphone. They are taken straight to the bot and can chat with it immediately.
There is no auto-save! After every change in the configuration, click Save (in German: "Speichern") at the bottom right. Otherwise all your adjustments are lost.
Add-ons
Via the sidebar entry Add-ons you open the Add-ons | Bot area. Here you see all the extensions available for your bot.
Add-ons – available extensions for your bot
Voice Agent (LetzTalk)
The LetzTalk Voice Agent is an independent AI phone assistant: it takes calls and can book appointments.
Buy LetzTalk (in German: "LetzTalk kaufen") – use the button to activate the Voice Agent for your bot right away.
Coming soon
These add-ons are in preparation and will be released shortly:
Outbound Manager – manage and automate outbound call campaigns.
Chat Avatar – 3D-animated avatar with lip sync for your chatbot.
To the marketplace
Via the Browse Add-ons button you open the add-ons marketplace, where you can discover further extensions and unlock them for your bot.
Browse Add-ons – jump into the marketplace
💡 Tip
If you can't find your way around the add-ons page: at the top right there is the ? icon – a click on it restarts the tour and guides you step by step through the functions again.
Voice Agent (add-on)
As soon as you have bought the Voice Agent (in German: "Sprachagent") in the Add-ons area, a new entry (Addon) Voice Agent (in German: "(Addon) Sprachagent") appears at the bottom of the left sidebar. Use it to open the configuration page of your phone bot.
Voice Agent configuration – greeting, translations, phone number and test call
Welcome message
Just as with the chatbot, you can store a Welcome message here too – that is, the sentence with which your phone bot first greets the caller. This message is spoken as soon as the call is accepted (e.g. "Hello, I am the digital assistant of … How can I help you?").
If you do not want to write a separate greeting, you can activate the Use chatbot configuration (in German: "Chatbot-Konfiguration verwenden") option at the top right – then the Voice Agent automatically takes over the greeting of your chatbot.
Interruptible
Directly below the welcome message you find the Interruptible (in German: "Unterbrechbar") switch. If it is active, the caller may interrupt the agent while the greeting is still running and ask their question right away instead of having to wait until the bot has finished speaking. This feels more natural and saves time.
Initial translations of the greeting
A bit further down you see the Initial translations of the greeting (in German: "Erstübersetzungen der Begrüßung") area. So that your bot can greet international callers in their native language, your welcome message can be translated into all supported languages (Arabic, Bulgarian, Czech, Danish, Greek …).
You have two options for this:
Translate all (in German: "Alle übersetzen") (top right) – translates the greeting at once into all languages at the same time with a single click. This is the fastest way if you have rewritten or changed the greeting.
Translate (in German: "Übersetzen") (per language) – each language additionally has its own button with which you can update only that one language. Handy if you only want to adjust the English version, for example.
You can also adjust every translated text by hand afterwards if you find a wording more fitting.
Your bot's phone number
On the right-hand side the phone number is displayed under which your Voice Agent can be reached (e.g. +49 30 75935332). A green "Running" label shows that the agent is active and can take calls. You can publish this number on your website, in signatures or on business cards.
Below that you find the Outbound call (in German: "Ausgehender Anruf") area: enter a target number there in the format +[country code][number] (e.g. +352123456789) and click Call (in German: "Anrufen") to have the bot actively dial a specific number.
Testing the phone bot
At the bottom right you find the Call phone bot (in German: "Telefonbot anrufen") button (with the note "Test me"). A click on it starts a test call directly from the browser – so you can listen for yourself at any time to how your Voice Agent sounds, before real customers call.
💡 Tip
Test your greeting after every change using the Call phone bot button. Some sentences read well but sound clumsy when spoken – abbreviations, long nested sentences or special characters can cause trouble in the speech output.
Instructions (prompt)
If you scroll further down on the Voice Agent page, you reach the Instructions (in German: "Anweisungen") area. Here you store the prompt – that is, the text that tells the bot who he is, how he behaves and what he is allowed to do. You can write a completely new prompt for your phone bot here (e.g. if it is supposed to take on different tasks than your chatbot) or reuse the same prompt you already set up for the chatbot.
If your Voice Agent should answer exactly like your chatbot, simply click the Use chatbot configuration switch at the top right. Then the Voice Agent automatically takes the prompt from your chatbot configuration – you don't have to maintain anything twice.
Voice Agent – instructions (prompt) and available tools
Not sure what a prompt is or how to write a good one? With the Instruction Generator you get a suitable prompt in just a few minutes – explained step by step:
At the very bottom of the page you find the Available Tools area again – that is, all the functions your Voice Agent may use during a call. Typical tools for the phone bot are:
get_current_date_time – query the current time and date.
If you scroll down a bit further, you reach the remaining settings around language, voice and the call limits of your Voice Agent.
Voice Agent – language, voice and call limits
Language
Language (in German: "Sprache") – the main language in which your agent opens the call (e.g. German). It is also used for the first words spoken, before it is clear in which language the caller answers.
Additional languages (in German: "Weitere Sprachen") – here you tick all the languages in which your agent should be able to answer (e.g. Arabic, English, Spanish, French, Italian, Dutch, Portuguese). Any number of them can be active at the same time.
Enable automatic language detection (in German: "Automatische Spracherkennung aktivieren") – if you switch this on, the bot detects on its own which of the enabled languages the caller speaks and automatically answers in the same language. Handy for a multilingual clientele.
Voice
In the Voice (in German: "Stimme") field you choose, from a list of many different voices, the one your bot should speak with (e.g. German Apollo – Inspiring and Clear). The selection includes male and female voices in different languages and characters. This voice is used for the text-to-speech conversion – that is, for making your bot's answers audible.
Call limits
With the following three fields you define how intensively your phone bot may be used – this protects you from unexpectedly high costs and from overload:
Maximum call duration (seconds) (in German: "Maximale Anrufdauer") – how long a single call may last at most. Example: 900 = 15 minutes. After that the bot ends the conversation automatically.
Daily call limit (in German: "Tägliches Anruflimit") – the maximum number of calls your bot accepts per day. Example: 100 – once the limit is reached, further callers are rejected.
Concurrent calls (in German: "Gleichzeitige Anrufe") – how many people can be on the phone with your bot at the same moment. Example: 5 – the sixth caller only gets through once an ongoing conversation has ended.
⚠️ Important – save!
For your changes to the Voice Agent to be applied, click the orange Save agent configuration (in German: "Agentenkonfiguration speichern") button at the very bottom. Without that click, all your adjustments are lost.
Calendar
The Calendar (in German: "Kalender") entry in the left sidebar (Bot Management area) opens the calendar setup guide. This page is a pilot: in three steps it shows you how to create your own account at MyCalendar (calendar.kibot.chat) and connect it with your bot – so that your bot can retrieve and book appointments.
Calendar setup guide – step 1 (register), step 2 (connect calendar), step 3 (user name in the prompt)
Step 1 – Create an account
Click "Register here" (in German: "Hier Registrieren") – this takes you to calendar.kibot.chat, where you create an account with a user name, e-mail and password. You will find the full registration instructions in the next chapter:
After logging in you choose which calendar you want to connect. Supported are:
Outlook Calendar
Google Calendar
Apple Calendar
ICS Feed – for other calendar providers with an ICS link.
For each provider you click Connect (in German: "Verbinden") and log in to the respective service. That way the bot knows on which days and at which times you are already booked – and when it may enter new appointments.
Step 3 – Insert your user name into the prompt
So that your bot knows which calendar it should use, you enter your MyCalendar user name directly into the prompt of your bot. An example:
Die Zeitzone ist die mitteleuropäische (Berlin). Beachte das immer.

du bist ein Bot zum buchen von Terminen.

du hast 5 Funktionen:

my-calendar_GetAppDates zum Abrufen verfügbarer Timeslots

my-calendar_book_appointment zum Buchen von Terminen

my-calendar_CancelAppointment zum Stornieren von Terminen

my-calendar_GetBookingUIDsByEmail zum Abrufen von Buchungen per E-Mail

my-calendar_RescheduleAppointment zum Verschieben von Terminen

username = xxx

eventType = 30min
Replace xxx with your own MyCalendar user name and 30min with the name of the matching event type (see Chapter 3 – Creating event types).
⚠️ Important – time zone
Leave the line "Die Zeitzone ist die mitteleuropäische (Berlin). Beachte das immer." at the very top of the prompt – otherwise the bot will accidentally book appointments in the wrong time zone.
💡 Tip
The calendar setup guide in LuxAIaaS is only a quick start. If you want to set up the calendar in detail (availability, event types, teams, managing bookings), have a look at Chapter 3 – MyCalendar.
Chat logs
In the Chat logs (in German: "Chat-Protokolle") area you find all the conversations that have been held with your bots. Here you can view and search through histories and, if needed, edit several of them at once.
The view consists of four areas:
Filters (in German: "Filter") – narrow down the conversations at the top by phone number, type, period and status.
Conversation list (in German: "Gesprächsliste") – as soon as your bot is live, all conversations held appear in this list.
Multiple selection (in German: "Mehrfachauswahl") – select several conversations at once and edit them together.
Message view (in German: "Nachrichtenanzeige") – if you select a conversation in the list, the full history appears next to it on the right.
In the Costs (in German: "Kosten") area you get a detailed overview of all the spending on your account – traceable at any time and breakable down by different criteria.
The view consists of the following areas:
Total costs (in German: "Gesamtkosten") – shows the total costs for the currently selected period at a glance.
Period calendar (in German: "Zeitraum-Kalender") – select here the period for which the cost overview should be shown.
Quick filters (in German: "Quick-Filter") – quick filters for frequently used periods: Today, This week, This month.
Cost tabs (in German: "Kosten-Tabs") – different views of the costs: broken down by Chat Bot Pricing, Voice Agent or Chat Bot Tokens.
Cost table (in German: "Kosten-Tabelle") – below that you find a detailed breakdown of all costs.
Costs – total costs, period selection, tabs and detail table
Chapter 3 – Agent Functions
What functions does your agent have?
Your voice bot or chatbot can do more than just answer – it can also perform actions – so-called functions (or "tools"). Which function is used when is defined in the prompt of your bot. The most important functions are:
current_time – returns the current date, time and day of the week.
Book appointments via MyCalendar – so customers can book an appointment themselves (see below).
send_email – forward enquiries by email to a recipient.
transfer_call_to_human – transfer an ongoing call to a human.
end_call – end the call.
current_time – retrieve the current time
Returns the current date, time and day of the week (server time, Europe/Berlin). It is called at the very beginning of every conversation so that the bot can convert relative time references from the caller ("tomorrow", "next Friday", "in two weeks") into concrete dates. Requires no parameters.
Usage example (this is how you can phrase it in the prompt):
"First of all, use the current_time function so that you know the current date and day of the week."
send_email – send an email
Sends an email with customer data and enquiry details to a defined recipient. It is used when the bot has to forward customer enquiries, callback requests, invoice questions or complaints to support.
Required parameters:
emailSubject – short summary of the enquiry, e. g. "Callback required – Max Mustermann".
emailReceiver – the recipient address.
emailContent – complete email body with the customer's name, their request and all relevant details from the conversation.
Usage example (this is how you can phrase it in the prompt):
"Send emails with the send_email function to emailReceiver XYZ@ABC.com."
"All enquiries regarding invoices must be sent with send_email to emailReceiver XYZ@ABC.com."
Transfers the current call to a human being. Use this tool only if the caller explicitly wants to speak to a human or if you cannot help them any further.
Required parameters:
phone_number – phone number in international format, e. g. +3520000000.
call_sid – is taken automatically from the dynamic variable system__call_sid, no manual setting required.
Call transfer example – only if the customer explicitly wants it, e. g. "I want to speak to a human now!" or "Connect me with a human" or similar. Then:
So that MyCalendar can see when you already have other appointments, you have to connect your own calendar. Here is how:
Open the App Store in MyCalendar.
Choose a calendar that you want to connect – e. g. Google Calendar (in German: "Google Kalender") or Outlook Calendar (in German: "Outlook Kalender").
Click on Install (in German: "Installieren") and follow the steps to link it.
MyCalendar – install a calendar from the App Store
Configure your calendar
After the installation you have to define which calendar bookings are written to:
Click on Installed Apps (in German: "Installierte Apps").
Then click on Calendar (in German: "Kalender").
There you can set which calendar receives what.
⚠️ Important
The calendar has to be enabled so that bookings can be made in it.
Installed Apps – select and enable the calendar
Set your availability
Under the item Availability (in German: "Verfügbarkeiten") you define when customers can book appointments with you.
Enter your regular availability hours.
Select your Time zone (in German: "Zeitzone") in the top right – this adjusts the times to your location.
Under Date overrides (in German: "Datumsüberschreibungen") you can add dates on which your availability differs from your usual business hours (e. g. public holidays, vacation or spontaneous special appointments).
Availability – hours, time zone and date overrides
Create Event Types
An Event Type (in German: "Ereignistyp") is a template for appointments. For example a "30 minute appointment" or a "first consultation". You can create as many Event Types as you like – each one gets its own booking link.
This is how you create a new Event Type:
Click on Event Types in the left-hand menu bar.
Click on New (in German: "Neu") in the top right.
Enter a Title (in German: "Titel") (e. g. "30 minute appointment").
Enter a short name in the URL field (e. g. 30min) – this is the part of the link that the customer sees.
Select the Duration (in German: "Dauer") (e. g. 30 minutes).
Click on Save (in German: "Speichern").
Event Types – overview of the created appointment templates with booking link
Your booking link is made up of your username and the Event Type, e. g.: /dilux/30min.
💡 Tip
You also need the Event Type when you add the appointment booking link to the prompt of your chatbot. There you specify username and eventType separately, for example:
username: dilux eventType: 30min
Teams
With Teams you can add several people to your appointment types. That way customers can book an appointment with your whole team – not just with you.
There are two scheduling types:
Collective scheduling (in German: "Kollektive Planung") – all selected team members have to be available. Suitable for meetings that the whole team attends.
Round Robin scheduling (in German: "Round Robin Planung") – the system automatically finds the most suitable person from the team. Good if anyone in the team can take the appointment.
Teams – overview with the "Create team" button and the available features
Create a team
Click on Teams in the left-hand menu bar and then on the Create team (in German: "Team erstellen") button. You will now be guided through the setup in three steps.
Step 1 – Team name & team URL
Give your team a Name (in German: "Name") (e. g. YOUNEA).
The team URL is generated automatically from the name. However, you can overwrite it and assign a different URL name.
Click on Next (in German: "Weiter").
Step 1 – assign a team name (the team URL is filled in automatically)
Step 2 – Add team members
Click on + Add team member (in German: "+ Teammitglied hinzufügen") and invite the people you want.
You yourself are already listed as the Owner (in German: "Inhaber").
Click on Next as soon as all members have been added.
Step 2 – invite team members to the team
Step 3 – Create an appointment type & choose the assignment
Enter a Title (in German: "Titel") for the appointment type.
Enter the URL under which the appointment can be booked.
Choose the matching Assignment (in German: "Zuordnung"):
Collective (in German: "Kollektiv") – meetings in which all selected team members are available.
Round Robin – meetings rotate automatically between several team members.
Managed Event (in German: "Verwaltetes Ereignis") – Event Types are distributed to team members as a block.
Click on Done (in German: "Fertig").
If you do not want to set this up yet, click on "I'll do this later" (in German: "Ich werde das später tun") at the bottom – the team is then created and you can add the appointment types later.
Step 3 – create an appointment type and choose the assignment (or set it up later)
Manage your team
After you have created your team, you can adjust it at any time. This is how you get to the team settings:
Click on Teams in the left-hand menu bar.
In the middle you can see your team. Click on the team name (see the arrow in the image).
Teams overview – click on the team name to open the settings
In the team settings you will find the following areas:
Profile (in German: "Profil") – overview of your team.
Members (in German: "Mitglieder") – view members and add new ones.
Appearance (in German: "Darstellung") – customize the look of the booking page (e. g. System default, Light, Dark, or your own brand colors).
Billing (in German: "Abrechnung") – billing information for the team.
Settings (in German: "Einstellungen") – general settings, e. g. make the team private, booking frequency or Round Robin configuration.
Appearance – design of the booking page and your own brand colorsSettings – e. g. make the team private, booking frequency and Round Robin configuration
⚠️ Important
After every change, click on Update (in German: "Aktualisieren") in the bottom right. Otherwise your settings will not be saved.
Manage bookings
When you click on Bookings (in German: "Buchungen"), all upcoming and past appointments are shown to you.
Cancel an appointment:
Click on the three dots to the right of the appointment in question.
Click on Cancel (in German: "Absagen").
You can enter a reason why the appointment was cancelled – that way the customer knows immediately.
Bookings – overview of all appointments with the cancel function
⚠️ Important
Always connect MyCalendar with your calendar (Google, Outlook). Only then can the system see when you already have other appointments. Otherwise double bookings can occur.
Chapter 4 – Customer Shop
The product range in the Customer Shop
Here is an overview of all products and extensions you can order for your customers in the shop. You can always see the current prices and detailed terms directly in the live shop.
Go straight to the Customer Shop
Browse the range, check prices, order products directly — on the official YOUNEA shop page.
These features change or extend one specific bot. Important: when ordering, always enter the bot ID in the Order notes (in German: "Bestellnotizen") so it is clear which bot you mean.
mail-summary
Feature activation for 1 bot
€39/bot
Automatic conversation summary by e-mail after every call.
When ordering: enter the recipient e-mail address + bot ID in the note.
Add it to the prompt once it is enabled — after that it sends automatically.
Tailor-made interfaces that let bots access external tools. Two variants:
Master interface: A central connection that can be used by several agents. Login details are conveniently entered via prompt. Higher one-off setup fee — but every additional agent on it is free. Bot interface: A 1:1 connection between a single bot and an external tool.
WhatsApp
Bot interface
€850/bot
WhatsApp connection for one specific chatbot.
Requirement: META Ads Manager set up at the customer's end.
Platform Extensions — default settings for the whole platform
Instead of configuring every bot individually, you set a function or setting as a platform default. All new bots then adopt it automatically. You can change the setting again at any time.
Welcome Stop
Platform default
€19/bot
Prevents the greeting from being interrupted — but as the default for all new bots.
Important for outbound calls across the entire platform.
The best LLM available. When you buy minute packages, you get a volume discount — the bigger the package, the cheaper the price per minute. Without a package, up to 1,000 minutes cost €0.24/min. Billing is always to the second, and all packages are valid for 30 days.
Cheaper per-minute rates for standard use cases — available soon in the Customer Shop.
💡 Tip
Prices and availability can change. For current terms, always check directly in the Customer Shop.
Chapter 5 – Creating a Customer & Buying an Agent
WooCommerce · Booking Journey
How your customer gets their own agent.
Almost everything happens on your website – in the shop your customers actually see. This chapter walks you through the whole journey: from the customer account through the cart to the credit the bot is bought with on the platform. Either the customer buys it themselves – or you log into their user account, book the agent for them and set it up right away.
ImportantThe bot must always be bought through the customer's account. Moving it to another account later is not possible.
What is this chapter about?
There are two views of your shop, and it pays to keep them apart:
Backend (your-domain.com/wp-admin) – the admin area only you see. That is where you manage orders, products and coupons. It is covered in Chapter 1.
Frontend (your-domain.com) – the public website your customer sees. That is what this chapter is about.
Here we stay almost entirely in the frontend – only one of the three options in step 1 and topping up credit take a short trip into the backend. You can click through the journey yourself at any time – ideally in a private browser window, so you see exactly what a new customer sees.
💡 Tip
Chapter 4 shows you what is available (catalogue and prices). This chapter shows you how the purchase works. The two belong together.
The journey at a glance – what the customer does without you
Your customer walks these four stages on their own – from registration to payment. The bot is created afterwards in the LuxAIaaS dashboard, paid for from the credit that came with the shop purchase. If you want to take parts of it off their hands, options 2 and 3 in step 1 lead there.
👤
1. Customer account
The customer creates their account on your website themselves.
🤖
2. Choose a product
Pick one product: KI Chatbot or KI Chat & Voicebot. Add it to the cart.
🧾
3. Checkout
Enter billing details, fill in the order note, accept the terms.
✅
4. Payment
Card via Stripe or bank transfer. The credit is then waiting in the LuxAIaaS dashboard.
The journey you run completely for your customer
If the customer should not have to do anything at all, you take over these five steps – partly in the admin area, partly in their account. At the end you hand over a fully configured bot. This route corresponds to option 2 or 3 from step 1.
➕
1. Create the account
Create the customer account via My account on the website – or directly in WordPress under Users.
💶
2. Top up credit
Book virtual credit onto the new account in WordPress via Wallet.
🔑
3. Log into the account
Sign in with the customer's credentials – or, as an admin, click your name at the top and switch into any user account from there.
🛒
4. Buy the bot
Pay from the credit via Buy new chatbot. The bot gets its bot ID.
⚙️
5. Configure the bot
Set up prompt, knowledge base and functions – then hand it over to the customer.
The pages of your shop
Your customer needs these four pages to buy. Replace your-domain.com with your own website address.
Page
Address
What for?
Buy an agent
your-domain.com/agent-kaufen/
Overview of every agent your customer can buy – with description, price and the "Add to cart" button.
Cart
your-domain.com/cart
Intermediate step: check quantities, enter a coupon code.
Checkout
your-domain.com/checkout
Billing details, order note, payment method – this is where the order is placed.
My account
your-domain.com/my-account
Login, registration, order history and invoices for the customer.
💡 Tip
If one of these addresses does not work on your site, the page may simply have a different name in your shop. You will find all shop pages in the menu at the top of your website or via the cart icon.
Step 1 – The customer account
Every agent belongs to a customer account. Without an account there is no access to the LuxAIaaS dashboard – so the customer could not operate their bot at all. There are three ways for the account and the credit to come about. They lead to the same result and differ only in how much the customer does themselves.
Option
Account is created by
Credit comes
When does it fit?
1 – The normal booking journey
the customer themselves, on your website
from the purchase in the shop
The standard case: the customer orders and pays themselves.
2 – Account via the website, credit from you
you, via My account in the frontend
from you via Wallet
The customer should start without paying in the shop.
3 – Everything in the admin area
you, in WordPress under Users
from you via Wallet
You do everything yourself – for test or demo accounts, say.
Option 1 – The normal booking journey
The normal case: the customer comes via your website and creates the account themselves. It takes less than a minute.
The customer opens your-domain.com/my-account – or clicks My account in the menu.
On the left there is Login (in German: "Anmelden") for existing accounts, on the right Create a new customer account (in German: "Neues Kundenkonto anlegen") – that is where it continues.
They enter their email address and choose a password. No username is needed.
Type in the security check – the distorted word in the image. The arrow symbol next to it generates a new one if it is unreadable.
Click Create a new customer account.
They land straight in their account area and receive a confirmation email.
Registration also works in the middle of a purchase: anyone going to checkout without an account can set a password right there – the account is then created automatically along with the order. On this route the credit comes from paying in the shop. Steps 2 to 5 describe exactly this route.
My account – "Anmelden" (login) on the left, "Neues Kundenkonto anlegen" (register) on the right with a security check
Option 2 – Account via the website, credit from you
Handy when you look after the customer personally – after a sales call, for example. The account is created via the website as in option 1, but the customer does not pay in the shop. Instead you top up virtual credit for them.
Open your-domain.com/my-account in a private browser window (so your own login does not get in the way).
Create the account with your customer's email address and choose a secure initial password.
Switch to the Wallet area in WordPress and top up virtual credit for the new user.
Pass the credentials on to your customer – by phone or another secure channel.
Ask them to change the password on first login under Account details.
With that credit the customer then buys their bot in the LuxAIaaS dashboard – exactly as in option 1, just without a shop order. How topping up in the Wallet works is described in Chapter 1.
Option 3 – Creating the user entirely in the admin area
Here you leave the frontend for once: you create the user directly in WordPress. Useful for test and demo accounts, or when the customer should not have to do anything at all.
In WordPress, go to Users (in German: "Benutzer") in the left menu and click Add New (in German: "Hinzufügen").
Enter Username, Email, First Name and Last Name.
Use the automatically generated password or choose one of your own.
Under Role be sure to select Customer (in German: "Kunde") – not Subscriber.
Click Add New User.
Then top up virtual credit for the new user in the Wallet area.
The full instructions with screenshots – both for creating the user and for the Wallet – are in Chapter 1.
With options 2 and 3 you can go one step further: log in to the customer's account and book and set up the agent for them right away. The customer is then handed a finished setup and has nothing left to do.
As an admin you do not even need their credentials for that: in the LuxAIaaS dashboard, click your name at the top – the drop-down menu lets you switch straight into any user account.
⚠️ The bot belongs to the account it was bought in
Always buy the bot through the customer's account – never through your own. Moving it to another account later is not possible. Whatever is bought in the wrong account stays there.
⚠️ Important
Never send credentials together in a single email. Username by email, password by phone or messenger – or let the customer set the password themselves via Lost your password?.
💡 Tip
If no email arrives, it is almost always your website's email delivery. Check Post SMTP in Chapter 1 – and have the customer check their spam folder as well.
Step 2 – Choosing the right product
On the price overview page there are two products side by side – and the customer takes exactly one of them. The voicebot is not bought separately: it is already contained in the larger of the two products, together with the chatbot. Both are billed monthly, and the prices are printed right on the tiles.
Product
What is it?
What is it for?
KI Chatbot chat only
A written assistant that answers questions around the clock. Includes its own knowledge base, an integrated calendar and an optional email interface.
Answering questions on the website, collecting leads, offering appointments.
KI Chat & Voicebot chat and phone in one product
Everything from KI Chatbot – plus a bot that handles real phone calls. Additionally with Human Transfer, the handover to a person.
On top of chat: taking calls outside business hours, booking appointments, recording callback requests.
The customer always buys one product only. If they need phone calls as well, they take KI Chat & Voicebot straight away – the chatbot is already included in it. So there is no need to put two products in the cart.
⚠️ Master platforms: the route is hidden
On master platforms the buying page is not linked in the main menu. Your customer only gets there via the foot of the page: scroll all the way down and click Testaccount in the Platform column. Tell them beforehand – otherwise they will search the menu in vain.
Footer of a master platform – the "Testaccount" link sits in the "Platform" column
Go to your-domain.com/agent-kaufen/ – on master platforms via Testaccount in the footer.
Compare the two tiles – features and price are printed right on them.
Click Add to cart on the tile that fits. You land in the cart straight away.
Buy an agent – the price overview with both products and the "In den Warenkorb" (add to cart) button
💡 Tip
Both products contain a one-off starting credit – it is listed as a feature right on the tile. That credit lands in the LuxAIaaS dashboard, and it is exactly what the customer buys their bot with there.
Step 3 – The cart
After clicking Add to cart you land here automatically. The cart is the last stop before checkout – up to this point everything can still be changed.
A coloured notice at the top confirms which product was added. Continue shopping takes you back to the selection.
The table lists product, price, quantity and subtotal. The × on the far left throws a row out again.
If you have granted a discount: enter the coupon code and click Apply coupon. The deduction appears in the total straight away.
On the right under Cart totals you find subtotal, VAT and grand total.
Click Proceed to checkout.
💡 Tip
You create coupon codes beforehand in the backend under WooCommerce → Coupons (Chapter 1). Useful for campaigns such as "first month free" or discounts for existing customers.
Cart – product row, coupon code, totals and "Weiter zur Kasse" (proceed to checkout)
Step 4 – Checkout
On the checkout page the customer enters their details. This is the most important step of the whole journey – it decides whether the invoice and the credit end up on the right account.
Billing details
First and last name of the person entering into the contract.
Company name, if it is a business customer.
Full address including country – this is what appears on the invoice.
Email address – order confirmation, invoice and credentials all go there. It has to be correct.
Phone number for follow-up questions.
The order note – please do not skip it
At the very bottom of the checkout page you will find the field Order notes. For a plain agent purchase it can stay empty – the bot is only created later on the platform. The field matters as soon as an add-on for an existing bot is ordered:
For every add-on to an existing bot: always state the bot ID.
If the feature needs an address (e.g. mail-summary): add the recipient email.
Anything else that matters for the order – questions, preferred dates, special requirements.
⚠️ Important
Without a bot ID an add-on feature cannot be assigned to any bot – the order then sits and waits until someone asks. The customer finds the bot ID in the bot overview of their LuxAIaaS dashboard.
Terms and privacy
Right at the bottom, under Your order, there are two mandatory tick boxes. Without both of them the order cannot be submitted:
Agreement to the terms and conditions, the privacy agreement and the DPA (data processing agreement).
For digital products: the explicit consent that performance begins before the withdrawal period expires – which extinguishes the right of withdrawal.
All three linked documents must exist on your website – more on that in Chapter 9.
Your order – the two mandatory tick boxes before submitting
Step 5 – Payment
In the lower part of the checkout page the customer chooses how to pay. Two routes are available – and they differ mainly in how quickly the credit arrives in the dashboard.
Immediate
💳
Credit card (Stripe)
Card details are entered right on the checkout page. Payment is confirmed within seconds and the order moves to Processing automatically.
The credit is available almost immediately.
1–3 working days
🏦
Invoice / bank transfer
The customer receives the bank details on the confirmation page and by email. The order stays On hold until the money arrives.
You release the order once payment has landed.
⚠️ Important
For card payment to be offered at all, Stripe has to be set up once. You do that in the backend under Payments – see Chapter 1. Without Stripe configured, your customer only sees bank transfer at checkout.
Clicking Buy or Place order completes the booking journey. The customer lands on the confirmation page with their order number – worth noting down.
What happens next
The order itself runs through without you. The last step is up to the customer, though – no bot is created automatically:
Stage 01
📥
Order received
The order is in, the money is not. With card payment this only takes seconds.
Status: On hold
Stage 02
💰
Payment confirmed
The money has arrived. Order confirmation and invoice go out automatically by email.
Status: Processing
Stage 03
⚙️
Credit added
The purchase amount lands as credit in the customer's LuxAIaaS account. No bot is created automatically.
Visible at the top right of the dashboard.
Stage 04
🚀
Customer buys their bot
In the dashboard the customer clicks Buy new chatbot and pays from their credit. Only now does the bot come into existence, with its own bot ID.
This step is done by the customer.
💡 Tip
The customer can check the status themselves at any time: your-domain.com/my-account → Orders. All invoices are available there as PDF downloads too.
The first steps for your customer
The shop purchase is done – now the customer collects their bot on the platform. This order has proven itself and takes about half an hour:
Log in to the LuxAIaaS dashboard – with the credentials from the email. The credit from the purchase is shown at the top right.
Buy the bot – via the Buy new chatbot button, paid from the credit. The bot then appears in the overview with its bot ID, which is needed for every future order.
Write the prompt – this is where the customer defines how the agent behaves. The fastest way is the instruction generator.
Fill the knowledge base – upload website, price list and FAQ so the agent can give real answers.
Activate functions – appointments via MyCalendar, email forwarding, call transfer. All of it in Chapter 3.
Test it – chat or call with the agent once yourself before letting it loose on customers.
Embed it – add the chatbot script to the customer's website (see Cookie Consent) or activate the phone number.
What to do when something goes wrong
These three cases come up most often. All three have a calm solution.
01
The customer has paid, but the order is still "On hold".
Check in your Stripe account or bank account whether the money really arrived.
If it did: open the order in the backend under WooCommerce → Orders and set the status to Processing.
Send the customer a short note that things are moving.
02
The customer did not receive a confirmation email.
Ask the customer to check their spam folder.
Check in the order whether the email address is spelled correctly.
If it happens repeatedly, email delivery is the problem: check Post SMTP (Chapter 1).
03
The credit does not show up in the LuxAIaaS dashboard.
Check that the order really is Processing or Completed.
Check that the customer is logged in with the same email address they ordered with – by far the most common cause.
Look under Credit → Recent transactions to see whether the top-up was booked.
If none of that helps: contact support with the order number (Contact & Help).
✅ Checklist before your first real customer
Work through these points once and the journey will run cleanly:
Stripe is set up and a test payment has gone through.
Post SMTP is sending – the confirmation email arrives and does not land in spam.
Terms, right of withdrawal, privacy policy and legal notice are in place and linked at checkout.
Your company details and logo appear on the invoice.
Your customer knows that they create the bot themselves in the LuxAIaaS dashboard after the purchase – the shop purchase only delivers the credit.
You have walked the whole journey yourself once – in a private browser window, like a real customer.
Chapter 6 – Onboarding Platform
What is the Onboarding Platform?
The Onboarding Platform is your learning hub as a YOUNEA partner. Here you'll find ready-made courses on every key topic around your white-label AI business — from the business model to data protection to the technical setup of the AI agent.
Every course is split into short modules, shows you concrete use cases and walks you through the topic step by step. That way you gradually build up all the know-how you need to look after customers on your own.
🌍
4 languagesAll courses available in German, English, Spanish and French.
📊
Your own progressFor each course you can see how far along you are (e. g. "Progress: 50 %").
🔁
Available anytimeYou can pause courses, come back to them and go through them as often as you like.
Straight to the Onboarding Platform
Pick your language and log in at my.younea.lu to start the courses.
Onboarding Platform – dashboard with course tiles in several languages
Learning path: White Label Onboarding
The main course for new partners. In 5 modules you'll learn everything you need to build your own white-label AI business — from the business idea to the first integration. We recommend working through the modules in the given order, because they build on each other.
Module 01
Your AI Business Model & White Label Setup
💡
Your offering, your role, your business model. Incl. pricing & packages, customer acquisition, sales launch and white-label platform setup.
DEENESFR
Module 02
Data Protection, GDPR & AI Act
🛡️
The legal framework: GDPR, EU AI Act and data protection when working with AI. What you need to know and comply with.
DEENESFR
Module 03
Basic Settings of the AI Agent
⚙️
Basic settings for your AI agent: configuring persona, language, voice and behaviour correctly.
DEENESFR
Module 04
Settings: Prompt & Knowledge Base
📚
How to phrase the prompt and build a clean knowledge base, so that your agent answers reliably and in the right tone.
DEENESFR
Module 05
Interfaces & Automation
🔗
Connections to external tools, automated workflows and API integrations — how your agent plugs into your existing IT.
DEENESFR
⚠️ Important
You get access to the Onboarding Platform once the contract is signed. If you haven't received your login details yet, contact support (contact details at the end of the handbook).
Chapter 7 – Helpcenter
What is the Helpcenter?
The Helpcenter is the self-service help for your customers. Here they find answers to typical questions, step-by-step guides and explanatory articles on all the features you make available to them — right in the browser, without having to message you.
For you as a partner that means: fewer recurring support requests. For your customers: fast answers, around the clock.
🕒
Available 24/7Customers find an answer at night or on the weekend too — without waiting for you.
🔓
No login neededThe Helpcenter is public. Customers can open it directly, or you send them a link to a specific article.
🔄
Always up to dateArticles are maintained centrally — you don't have to document or update anything yourself.
Straight to the Helpcenter
Pick the language and send your customers the link, or take a look yourself: helpcenter.luxaiaas.com.
Helpcenter – home page with search field and topic categories
What your customers can do there
🔍
Search
Search for a keyword in the search field — the Helpcenter shows matching articles right away.
📂
Browse categories
Go through the topic areas when the right keyword doesn't come to mind.
📖
Read guides
Step-by-step articles with screenshots for all features.
Which topics customers find in the Helpcenter
The following topic areas are currently documented in the Helpcenter. The content is aimed directly at your customers — they can read up on things themselves, without you having to explain every step.
Topic 01
How do I set up an agent?
🚀
Step-by-step guide: how the customer sets up their first AI agent — from login to the active agent.
DEEN
Topic 02
Data Protection, GDPR & AI Act
🛡️
What the customer has to keep in mind when handling personal data — GDPR and the EU AI Act, explained in plain language.
DEEN
Topic 03
Basic Settings of the AI Agent
⚙️
Basic configuration of the agent: setting persona, language, voice and behaviour correctly.
DEEN
Topic 04
Settings: Prompt & Knowledge Base
📚
How the customer phrases the prompt and maintains their knowledge base, so that the agent answers reliably and in the right tone.
DEEN
Topic 05
Interfaces & Automation
🔗
How the customer connects external tools and builds simple automation workflows.
DEEN
💡 Tip for you as a partner
If a customer asks you a question that already has a Helpcenter article: just send them the link. That saves you time and the customer has the explanation in writing straight away — they can read it again later.
⚠️ Important
If a customer doesn't find an answer in the Helpcenter and contacts you — and you don't know either: don't guess. Contact support (contact details at the end of the handbook). Wrong information is harder to take back than a "Let me quickly check".
Chapter 8 – Interfaces
An interface (also called an API connection) links a bot to an external system – for example to a CRM, a shop, an inventory management system or a booking system. That way your bot can not only talk, but also act: retrieve data, create entries or book appointments.
At YOUNEA these connections are custom-built: a customer wants to connect their bot to a specific system, and we develop exactly the right interface for it – and make it available to the bot as functions (tools).
💡 Where to find what?
This chapter describes the process of a connection – from your point of view as a partner. You will find the technical API reference (keys, endpoints) in Chapter 2, and the prices of the interfaces in the catalogue in Chapter 4.
What is an interface?
Think of the bot as an employee. Without an interface, all it can do is provide information. With an interface it gets access to a tool – and can carry out real tasks with it.
Technically, an interface is a connection to the API (the “socket”) of an external system. We build this connection and attach it to the bot as a function. After that it appears with the bot in the list of Available Tools – just like the standard tools send_email or my-calendar_book_appointment (see Chapter 3 – Agent Functions).
Why do I need an interface?
Whenever the bot should do or know something outside the YOUNEA platform. Typical examples:
System
What the bot can do with it
CRM (e.g. HubSpot, Salesforce)
Create contacts, capture leads, look up customer data.
Shop / ERP (e.g. Shopify, inventory management)
Query order and delivery status, check availability, create orders.
Calendar / booking (e.g. MyCalendar)
Query free slots, book, reschedule or cancel appointments.
Own / custom REST API
Access to the customer's in-house systems with their own API.
Master interface or bot interface?
There are two variants of a connection. Which one fits depends on how many bots are meant to use the system:
Variant
Connection
When does it make sense?
Master interface
One central connection for several bots (1:n)
When several bots are meant to use the same system. Higher one-off setup, but as a rule every additional bot is free.
Bot interface
A 1:1 connection between one bot and the system
When only a single bot needs the system.
The specific prices (e.g. WhatsApp connection or custom interface billed by project days) are listed in the catalogue in Chapter 4.
How an interface project works
A connection can be commissioned in two ways: via the Younea Shop (“Custom Interface”, billed by project days – usually 1–3 days) or in direct contact with the partner or sales team for larger projects. After that it runs in these steps:
Clarify the requirements. The customer describes which system the bot is to be connected to and what it has to be able to do there.
Collect the documents. The customer provides everything needed for development (see next section).
Development. We build the interface and make it available to the bot as function(s).
Testing. Using the sample data, we check whether everything works as planned.
Go-live. The finished functions are activated for the bot under Available Tools – the bot can use them right away.
Available Tools – the custom-built functions (here Bowling_…) appear next to the standard tools after go-live.
What does the customer have to provide?
So that we can develop quickly and without nasty surprises, we need four things from the customer before the start:
API documentation – complete and up to date: which endpoints exist, how the login (authentication) works and which fields there are.
Planned bot workflow – what the bot should be able to do in the end, as final as possible. Changes in the middle cost time (see pitfalls).
Credentials / access – API keys and, if available, test/sandbox access. A contact person on the API side is also helpful.
Sample data / test cases – real sample records or test scenarios we can use to check the connection.
⚠️ Important – treat credentials like a password
Access data and API keys are secret. They never belong in the public front end, in shared documents or in public repositories. Only transmit them via a secure channel and, wherever possible, issue a separate key per application with only the necessary rights.
How does the bot use the finished interface?
After go-live, the connection shows up with the bot as a tool – in exactly the same list as the standard functions. The bot then decides on its own, based on the conversation, when to call the function (e.g. “look up order status” as soon as the customer asks about their delivery).
How you control in the system prompt when a function should be used is described in Chapter 3 – Agent Functions.
Common pitfalls
From experience – these three things delay a project most often:
⚠️ Outdated or faulty API documentation
If the documentation is wrong or incomplete, the connection cannot be planned properly – and unexpected errors keep coming up during development. Please ask the customer to provide up-to-date and complete documentation in advance.
⚠️ Changes to the workflow in the middle of development
If the customer changes what the bot should be able to do during implementation, everything has to be re-planned – and that costs extra time. The workflow should be as final as possible before the start.
⚠️ The external API changes
If the target API changes during (or after) the connection, the interface has to be adapted. Urge the customer to report such changes early on.
What about later changes?
If something changes after go-live in the external API or in the desired process, the interface usually has to be adapted. How this is handled in each individual case must be clarified individually.
💡 Tip
Keep the API documentation and access details up to date after go-live as well. That makes later adjustments considerably easier – and saves unnecessary troubleshooting.
✅ Done
You now know what an interface is, when you need one, how a connection project runs, what the customer has to supply for it and which pitfalls you should avoid.
Chapter 9 – Legal & Security
⚠️ Important — no legal advice
The information in this chapter is general guidance for you as a partner, not legal advice and no substitute for it. Laws change, and every individual case is different. For specific legal questions — e.g. about GDPR, Terms and Conditions (AGB), the legal notice (Impressum), liability or a cease-and-desist warning — please contact a lawyer.
What does GDPR mean for me?
GDPR is the data protection law in Europe. It says: you must handle your customers' data with care.
In concrete terms this means:
You need a legal notice (Impressum). That is mandatory.
You need Terms and Conditions (AGB) (Allgemeine Geschäftsbedingungen). They set the "ground rules" between you and your customers as soon as they buy something.
You need a privacy policy. It states what you do with the data.
You need a cookie notice. We take care of that with our Cookie Consent plugin.
You must not pass data on to third parties without permission.
Customers may have their data deleted at any time.
⚠️ Important
Violations can result in fines of up to €20,000. When in doubt, better ask one time too many before you pass on or store data.
Do I need a legal notice (Impressum)?
Yes. A legal notice (Impressum) is required by law for commercial websites in Germany (provider identification). It ensures that everyone can see who is behind the website. A missing or incomplete legal notice is one of the most common reasons for cease-and-desist warnings of all.
What usually belongs in the legal notice:
Name and address – for companies, the full legal form and an address for service of documents (no P.O. box).
Contact – email address and, as a rule, a telephone number.
Authorised representatives – e.g. the managing director of a GmbH.
Register & number – commercial register/registry court and register number, if available.
VAT ID – if you have a VAT identification number.
Person responsible for the content – name and address.
The legal notice belongs on a separate page (e.g. /impressum) and must be reachable from every page with no more than two clicks — ideally linked clearly visibly in the footer.
What has to go into the privacy policy?
The privacy policy is mandatory under the GDPR as soon as you process personal data — and you practically always do (contact form, cookies, shop, chatbot, statistics). It transparently explains to your visitors which data you collect, what for and for how long.
What a privacy policy typically covers:
Controller – who is responsible for the data processing (usually identical to the legal notice).
Which data is collected and for what purpose (e.g. order processing, getting in touch).
Services & cookies used – e.g. payment providers, statistics tools, chatbot, fonts.
Storage period – how long the data is kept.
Users' rights – information, rectification, erasure, objection.
Data protection contact and, if applicable, the data protection officer.
It, too, belongs on a separate page (e.g. /datenschutz) and should be linked in the footer on every page.
💡 Tip
The legal notice and privacy policy are not a copy-and-paste job — just like the Terms and Conditions. It is best to use a generator with an update service (e.g. eRecht24, IT-Recht-Kanzlei) or have them drawn up by a lawyer. You can fill these pages with your own details yourself in your website via the Divi Page Builder (see "Final Steps Before Going Live").
What are Terms and Conditions (AGB) and do I need them?
AGB stands for Allgemeine Geschäftsbedingungen (general terms and conditions). These are the "ground rules" that apply between you and your customers as soon as they buy something in your shop or accept an offer from you. As soon as you sell something commercially — including digital products or services — Terms and Conditions are practically indispensable.
Why are Terms and Conditions so important?
Good Terms and Conditions create legal certainty — for you and for your customers. They ensure that in the event of a dispute it is clear what was agreed, and they protect you from expensive surprises:
Protection against cease-and-desist warnings – missing or faulty Terms and Conditions (e.g. a forgotten right of withdrawal notice) are a popular reason for warnings. A cease-and-desist warning can quickly cost several hundred euros.
Clear rules instead of dispute – delivery times, payment, liability and withdrawal are recorded in writing. In case of disagreements you can refer to them instead of having to negotiate in each individual case.
Limited liability – without Terms and Conditions you are, in case of doubt, liable under the statutory standard rules. Well-drafted Terms and Conditions can limit your liability within the legally permitted boundaries.
Trust & professionalism – a shop with comprehensible Terms and Conditions, a legal notice and a privacy policy looks reputable. Customers prefer to buy where the legal framework is transparent.
Mandatory for commercial providers – certain information (right of withdrawal, provider identification, dispute resolution notice) is required by law. Terms and Conditions are the natural place to put it.
What your Terms and Conditions typically govern:
Conclusion of contract – when a purchase actually comes about.
Prices and payment – which payment methods you offer and when the money is due.
Delivery / provision – how and when the customer receives their product.
Withdrawal – the statutory 14-day right of withdrawal for consumers, including the right of withdrawal notice.
Warranty & liability – who is liable if something goes wrong.
Dispute resolution – reference to the EU platform for online dispute resolution.
Where do the Terms and Conditions belong?
As a separate page on your website (e.g. /agb).
Linked in the footer — clearly visible on every page.
In the ordering process before the purchase — with a checkbox for confirmation.
Example: legal notice (Impressum) as a separate pageExample: privacy policy as a separate pageExample: Terms and Conditions (AGB) as a separate page
Where do I get suitable Terms and Conditions?
Terms and Conditions are not a copy-and-paste job. Wrong or third-party Terms and Conditions can end up more expensive than having none at all. Two safe routes:
Lawyer – writes tailor-made Terms and Conditions for you. The safest option, one-off costs usually €200–500.
Terms and Conditions generator with an update service (e.g. eRecht24, IT-Recht-Kanzlei, Trusted Shops). Inexpensive, with automatic updates when the law changes.
⚠️ Important
Never copy Terms and Conditions from other websites — that is a copyright infringement and can lead to a cease-and-desist warning. Besides, third-party Terms and Conditions rarely fit your specific offering. If you are unsure, check with us or a lawyer beforehand.
What do I do in an emergency?
Emergency means: the website is gone, hacked or showing content that isn't yours.
Step 1: Stay calm
Even if it feels bad: it can almost always be solved. We have backups.
Step 2: Don't repair it yourself
Don't click randomly through the WordPress menu. That can delete traces of the attacker which we need for the analysis.
Step 3: Report it immediately
You can reach us via our emergency hotline: +49 176 20981651. In an emergency you can also write to this number directly via WhatsApp (wa.me/4917620981651).
Don't write any social media posts about it until we know about it. That can have legal consequences.
💡 Tip
Before you make a big change (e.g. testing a new plugin, switching the design): ask us. We'll make an extra backup for you beforehand. That way nothing can get lost.
✅ Done
You now know the most important rules on data protection, emergencies and backups. That's a relief.
Final Steps Before Going Live
Setting Up Payment
First, open your WordPress site. Then go to the Payments (in German: "Zahlungen") section and click Set up (in German: "Einrichten") to configure the payment details with Stripe.
Alternatively, you can go straight to the correct settings page by simply appending the following part to your website address:
Legal notice (Impressum), Data Processing Agreement, Terms and Conditions (AGB) & Privacy policy
It is best if you fill these pages with your own data and texts. With the Divi Page Builder, anyone can handle this easily. Just open the relevant page to do so. Divi can only be activated by an administrator.
Important Information About the Website
WooCommerce
1. Orders
The Orders (in German: "Bestellungen") section shows the complete history of every order placed.
2. Customers
The Customers (in German: "Kunden") section lets you see who has purchased the bot.
3. Coupons
In the Coupons (in German: "Gutscheine") section, you can create discount codes to offer your customers price advantages.
4. Reports
The Reports (in German: "Berichte") section shows the total revenue, optionally filtered by individual days.
5. Settings
The Settings (in German: "Einstellungen") section offers various configuration options, including those for payments.
⚠️ Important
To make sure payouts work correctly, you should enter your bank details.
General Information on AI Management
Dashboard
Under Dashboard you get an overview of all existing bots that have been bought and created.
Credit
In this section you can top up credit. Besides the manual top-up, there is also an automatic option: as soon as the credit falls below a minimum amount you define yourself, it is topped up again automatically. You can also set the amount that should be added during the automatic top-up.
Instruction Generator
The Instruction Generator uses AI to help you create optimal prompts – tailored to the respective use case.
Knowledge Base Assistant
The assistant automatically guides you through the process of creating plain text documents from documents containing text, images or tables. It does not create the documents for you; instead, it shows you step by step how to prepare them yourself – so your content can be used optimally for the knowledge transfer into the Knowledge Base.
My Account
Clicking on "My Account" (in German: "Mein Konto") takes you back to the account overview, where all relevant information is shown at a glance.
Deletion and Retention Periods
A value of -1 means that chats are not deleted. If a positive value is entered (e.g. 3), the chats are stored for 3 days and then deleted automatically.
Configuration
This section contains the LetzChat bot. Here you can create and optimise your own chatbots.
The Welcome message is shown before the conversation starts and allows for an individually defined greeting.
In the prompt you can define Instructions and rules of behaviour for the bot.
The setting "GDPR chat log retention (days)" determines how long chat logs are stored. A value of "-1" means that the logs are not deleted automatically. A value of "2" means that the logs are removed automatically after 2 days.
Under Available Tools you can add various functions to the bot. One example is "send_email": this function makes it possible to automatically send appointments to a previously defined email address after the conversation. Here is the link to the shop, where all available functions are listed and can be purchased: https://www.younea.ai/kundenshop
The language model forms the central core of the AI and determines its performance. Here you can define how complex and powerful the AI should be.
Display Settings
Under Display settings (in German: "Anzeigeeinstellungen") you can, among other things, define the language the bot should communicate in, for example English. You can also activate additional languages. With the "Additional_Languages" function, the bot is able to write in several languages. If a customer speaks French, for example, the bot automatically answers in French as well.
Under Bot Name you define the desired name for the bot.
In the "Configure the display of the bot here" area, you can add and activate the additionally purchased languages.
Under Color theme you can individually adjust the colour design of the bot chat.
(Add-on) Voice Agent
This section contains the voice bot
The Welcome message is shown before the conversation starts and allows for an individually defined greeting. In the prompt you can define Instructions and rules of behaviour for the bot.
Under Available Tools you can add various functions to the bot: one example is "send_email": this function makes it possible to automatically send appointments to a previously defined email address after the conversation. Here is the link to the shop, where all available functions are listed and can be purchased: https://www.younea.ai/kundenshop
In the Voice Agent (in German: "Sprachagent") section, a selection of different voices is available for you to choose from. In addition, the following parameters can be configured:
Maximum duration of a call (in seconds)
Daily call limit
Concurrent calls
With the "Concurrent calls" option, up to 30 calls can be processed in parallel.
Calendar
In the Calendar, customer appointments that were arranged during the conversation with the chatbot or the phone bot are entered automatically.
Creating an Invoice
With the "Invoice / Shipping" (in German: "Rechnung / Versand") plugin you can set the invoice template and the invoice layout.
Here you can then customise your invoice.
Duplicate Content
Because every partner initially receives a template site from us, it makes sense to replace the existing texts with your own. This is especially important for SEO (search engine optimization), so that your site ranks higher with the search engines – because if many sites have the same content, Google counts this as duplicate content. Your site would then not be shown on page 1 of a Google search, but on page 3, for example.
Creating Users
Here you can add new users.
Username and email address are mandatory. All other fields are optional. You can either set the password yourself or have it generated automatically.
Using the "Role" (in German: "Rolle") option, you can assign a role to the user. An administrator, for example, has access to the entire website.
Divi
If you click on "Enable Visual Builder", you can adjust the design of your page – for example texts, colours, images or layouts. The Visual Builder is very easy to use.
This is what the Visual Builder looks like. Here you can change texts directly or adjust colours in the design area. You can see the design options in the second image.
Topping Up Virtual Credit
You can top up the virtual credit for each individual user. To do so, go to the "Wallet" section and click on "Credit / Debit Funds".
In the "User Selection" area, click on "Include User" to add a user. Then select the "Credit" option and enter the amount to be credited to the user. Finally, save your entry.
Setting Up Multiple Languages for the Website
To add more languages, go to the Languages (in German: "Sprache") section.
Then fill in all the fields and add the language.
Once the language has been added, go to the Pages (in German: "Seiten") plugin.
For each page you will see a plus symbol per language. If you click on it, the Divi Page Builder opens. There you can either use an existing layout or create your own layout.
Needs Analysis
Would you like to connect an external system – for example a CRM, a ticketing system or a shop – to your bot? Then we need a few technical details in advance. There is a ready-made questionnaire for a pull API interface (read-only) – that is, a connection where we only read data from the source system and do not change anything.
💡 How to proceed
Download the questionnaire – as a PDF to print out or as a Word file (DOCX) to fill in directly on your computer. Complete it as fully as possible – ideally together with your IT team or the provider of the source system – and then send it back to us.
Do not enter real passwords, API keys or tokens in the questionnaire. We will exchange access credentials later via a secure channel.
FAQ – Frequently Asked Questions
Here you will find answers to the most frequently asked questions – sorted by topic. Look here first before you contact us. If the topic is covered in detail in the handbook, a link below the answer takes you straight to the right place.
Setting up & customising your bot
1. How can I adjust the functions and settings of my bot?
Everything that controls the behaviour of your bot is in LuxAIaaS under "Configuration" (in German: "Konfiguration"): welcome message, instructions (the system prompt), GDPR retention, Available Tools (in German: "Verfügbare Werkzeuge"), display settings (in German: "Anzeigeeinstellungen") and the embedding (in German: "Einbindung"). To the right of it you see a live preview and can test every change immediately. Important: there is no auto-save – click "Save" (in German: "Speichern") at the bottom right after every change.
In two steps: in LuxAIaaS you copy the website integration code under "Configuration → Embedding" (in German: "Konfiguration → Einbindung"). In WordPress you then hover over "Cookie Consent", click "Service" in the submenu, select the chatbot from the list, scroll down and paste the script there. Once saved, the chatbot automatically appears at the bottom right on every page of your website.
3. How do I include the functions (tools) in my prompt?
A tool has to appear twice: it must be activated under "Available Tools" (in German: "Verfügbare Werkzeuge"), and in the prompt you describe the trigger point – that is, when the bot should use it. Activating it is not enough on its own: without a description in the prompt, the bot does not know in which situation it may call the function. There is nothing to memorise: to the right of every function there is an (i) icon. Clicking it opens the info box, which repeats everything about that function – the matching prompt addition, an explanation and the parameters.
In the Dashboard you find a menu with three dots to the right of the bot. Click on it and select "Delete bot" (in German: "Bot löschen"). Important: pausing a bot is not possible – deleting is the only option. As long as a bot exists it is billed, including while it is inactive. So if you no longer need it, you have to delete it.
Yes. Just send us a short email – we will change the avatar for you. Not to be confused with the "Chat Avatar" add-on (the 3D-animated avatar with lip sync): that is a separate add-on and still in preparation.
It is probably missing knowledge. Open LuxAIaaS, click on "Knowledge Base" (in German: "Wissensdatenbank") and add suitable content (e.g. your FAQ or product descriptions). After a few minutes the answer should get better.
7. How can the chatbot retrieve bookings using the email address of the customer?
That is what the my-calendar_GetBookingUIDsByEmail function is for. It belongs to the MyCalendar functions, must be active under "Available Tools" (in German: "Verfügbare Werkzeuge") and must be listed in the prompt – then the bot can find the bookings of a customer via their email address. What exactly belongs in the prompt and which parameters the function expects is shown in the info box behind the (i) icon to the right of the function.
9. How can I adjust the lead time for bookings in the MyCalendar system?
The lead time defines how shortly before an appointment a booking is still allowed. If it is set to two hours, for example, no appointment can be booked within that time window. You can adjust this in the settings of the event type under "Limits".
10. The calendar integration does not work – what is the reason?
In most cases the parameters in the prompt do not match MyCalendar. Username and event type (eventType) have to be spelled exactly as in MyCalendar – even a slightly different name prevents the booking.
The send_email tool must be activated under "Available Tools" (in German: "Verfügbare Werkzeuge"). After that you define the trigger point in the prompt – that is, the situation in which the email should go out (e.g. "when the customer asks for a call back"). Without this trigger point the bot does not send any email. You will find the matching prompt addition and the parameters in the info box behind the (i) icon to the right of the function.
12. How do I activate the automatic conversation summary (mail-summary)?
There are two steps. First: mail-summary is a paid feature per bot (€39 per bot) and has to be enabled by us – you buy it in the Customer Shop and enter the recipient email and the bot ID in the order notes when ordering. Second: you also have to add the function to the prompt. Only then does the bot automatically send an email with a summary and the complete transcript after every conversation. If it is enabled but not mentioned in the prompt, nothing happens.
There are three common causes for that. First: the mail-summary function has not been enabled for this bot yet – it has to be bought in the Customer Shop and activated by us. Second: it is enabled but not added to the prompt – then the bot never triggers the sending. Third: the recipient email or the bot ID was missing in the order notes when ordering, so the system does not know where the summary should go. Get in touch with us if all three are correct and still nothing arrives.
14. How can I improve the structure of the Knowledge Base?
Work with clear headings and simple, short texts. The more cleanly a document is structured, the better the bot finds the right passage and the more precisely it answers.
15. Which requirements do the documents for the Knowledge Base have to meet?
The AI works best with plain text. Documents with images, tables or structured data should be converted into plain text beforehand – the Knowledge Base Assistant helps you with that.
16. How do I prepare documents and get to the right prompt?
There is an assistant for each of these. The Knowledge Base Assistant guides you through the preparation of your documents into plain text via chat. The Instruction Generator asks you a few questions (type of bot, environment, main purpose) and gives you a finished prompt at the end that you can use straight away.
17. How long does it take until the AI knows my new content?
Usually 5 to 15 minutes, with large files it can take a little longer. You can see the status in the Knowledge Base – as soon as it says "Ready" (in German: "Bereit") there, you can start testing.
18. How does the billing system work and which fees apply?
Billing runs via your credit. The running subscriptions (e.g. chat or voice subscription) and the usage fees of your bots are deducted from it. In the "Credit" (in German: "Guthaben") area you see every entry by category under "Recent transactions" (in German: "Letzte Transaktionen"), and in the "Costs" (in German: "Kosten") area the details per bot and period. The prices of the individual products and extensions are listed in the catalogue.
19. How can I understand the licensing and the costs that come with it?
Every bot runs on a subscription that is renewed automatically. Important: the renewal is debited from the credit. If the credit is not sufficient, the subscription cannot be renewed and the bot becomes inactive. To prevent that, the customer should set up an automatic top-up with a threshold in the LuxAIaaS credit management – as soon as the credit falls below that value, it is topped up automatically. The credit management is meant for customers; as an administrator you top up in WordPress via "Wallet" instead.
An agent is billed as long as it exists in your account – in both states: active and inactive. So an inactive bot still costs money. Only once you delete the bot does the billing stop. If you no longer need a bot, letting it go inactive is not enough – delete it.
No. Virtual top-ups by admin users (via "Wallet" in WordPress) are not charged by YOUNEA. What matters, however, is this: bots created by admins must have credit available as well. Without credit the subscription cannot be renewed and the bot becomes inactive – that applies to admin bots exactly as it does to customer bots.
22. My bot is suddenly inactive – how do I activate it again?
In the vast majority of cases the credit is not sufficient to renew the subscription. Top up credit – after a few minutes the bot automatically becomes active again. As a customer you top up via the credit management, as an administrator in WordPress via "Wallet".
23. How can I implement integrations with other systems or APIs?
An interface connects your bot to an external system (e.g. CRM, shop or calendar) and is then made available to it as a function. We build these integrations for you – the process runs from clarifying the requirements through the documents and the development to testing and go-live. For that you need API documentation, the desired workflow, credentials and test data.
24. How can entries in the history of contacts be created via API?
That is generally no problem. For that you need an API key with the matching permissions; the requests then run via the Public API. For a permanent connection to your system, get in touch with us – we will implement that as an interface.
25. How can I set up a WhatsApp AI bot and which information is needed for it?
We set up the WhatsApp connection for you – just write to us about it. You should have ready: company details, credit card, Facebook profile and phone number; we will clarify further details with you directly.
26. Do I have to enable anything in the META Ads Manager for the WhatsApp integration?
Yes. A META Ads Manager that has been set up on the customer side is a prerequisite for the WhatsApp connection. Without it the connection cannot be established.
Technically it would work via WordPress – but we advise against it. Along with the account you lose the customer's complete history: orders, customer invoices and everything else. On top of that, all bots of that customer are deleted with it. So when in doubt, delete only the bot and leave the account in place.
28. Does an employee have to get an administrator account?
Not necessarily. Anyone who only needs to work with the platform gets by with the "Customer" (in German: "Kunde") role – with it they see the platform and their own data, but have no access to WordPress. The "Administrator" role has access to everything, including other accounts, and should therefore be assigned sparingly.
On the login page, click the "Forgot password?" (in German: "Passwort vergessen?") link. You will receive an email with a new link. You can use it to set a new password.
31. Where do I get access to the Onboarding Platform?
You receive access automatically by email once the contract is concluded. If you have not received any login details after a few days, contact support.
33. Why do I not see any conversations in the chat history?
That is normal – it takes a short while until the conversations are displayed, usually about 5 minutes. If there is still nothing to see after considerably longer, get in touch with us.
Yes, and you do it yourself: in WordPress go to WooCommerce → "Orders" (in German: "Bestellungen") and open the order in question. From there you can simply refund it – even if the customer has already paid.
In the WordPress menu on the left you will find the item "Products" (in German: "Produkte") – that is where all the products of your shop are. Open the product you want, adjust the price and save. The new price is live immediately after that.
39. My emails do not arrive or end up in spam – what is the reason?
Then something is usually wrong with the email delivery. In WordPress, check under Post SMTP whether the sender name and sender email are stored and whether the SMTP credentials are correct. Always use a real address of your own domain as the sender – external addresses such as @gmail.com end up in spam considerably more often.
No, not without permission. That can cause legal problems. Only use your own images or images from sites such as Unsplash or Pexels. These are free of charge.
41. My website has been hacked – what should I do?
Do not repair anything yourself and do not write any social media posts. Call us immediately via the emergency hotline. We will restore a backup and analyse the breach.
Before you get in touch: take a quick look at the FAQ section. Many questions are already answered there.
⚠️ Important
Phone and WhatsApp are exclusively for real emergencies — such as a hacked website, an offline platform or data loss. For everything else, please use Teams chat or email so we can keep the emergency line free for urgent cases.
We wish you every success!
— Your YOUNEA team —
Appendix
Where do I find what? (Index)
Sorted alphabetically. Click on the chapter to jump straight there.